- Number of Workers: The number of worker processes handling inference requests. For TorchServe, this is configurable per model.
- Parallel Requests: The number of concurrent requests sent to the server, simulating different levels of user demand.
- Total Requests: The total number of requests sent during each test to ensure statistical significance.
We recorded the following metrics for analysis:
- Minimum Time: The shortest time taken to process a request.
- Maximum Time: The longest time taken to process a request.
- Average (Mean): The average time taken across all requests.
- Median: The middle value in the list of recorded times, providing a measure of central tendency less affected by outliers.
- Mode: The most frequently occurring response time in the dataset.
Results and Analysis
Scenario 1: Single Worker, Single Request
Configuration:
- Workers: 1
- Parallel Requests: 1
- Total Requests: 500
Performance Metrics:
| Approach |
Min Time |
Max Time |
Average |
Median |
Mode |
| TorchServe |
35.342ms |
55.192ms |
38.569ms |
38.082ms |
36.510ms |
| FastAPI |
29.045ms |
1276.5ms |
34.822ms |
31.326ms |
33.128ms |
Analysis:
- FastAPI had a slightly lower minimum and average response time, indicating faster individual request handling in this minimal load scenario.
- TorchServe showed more consistent performance with a smaller gap between minimum and maximum times, suggesting better reliability.
- FastAPI exhibited significant variability with a high maximum time, possibly due to occasional latency spikes.
Scenario 2: Single Worker, Moderate Concurrency
Configuration:
- Workers: 1
- Parallel Requests: 20
- Total Requests: 500
Diagrams illustrating the performance metrics for Scenario 2:
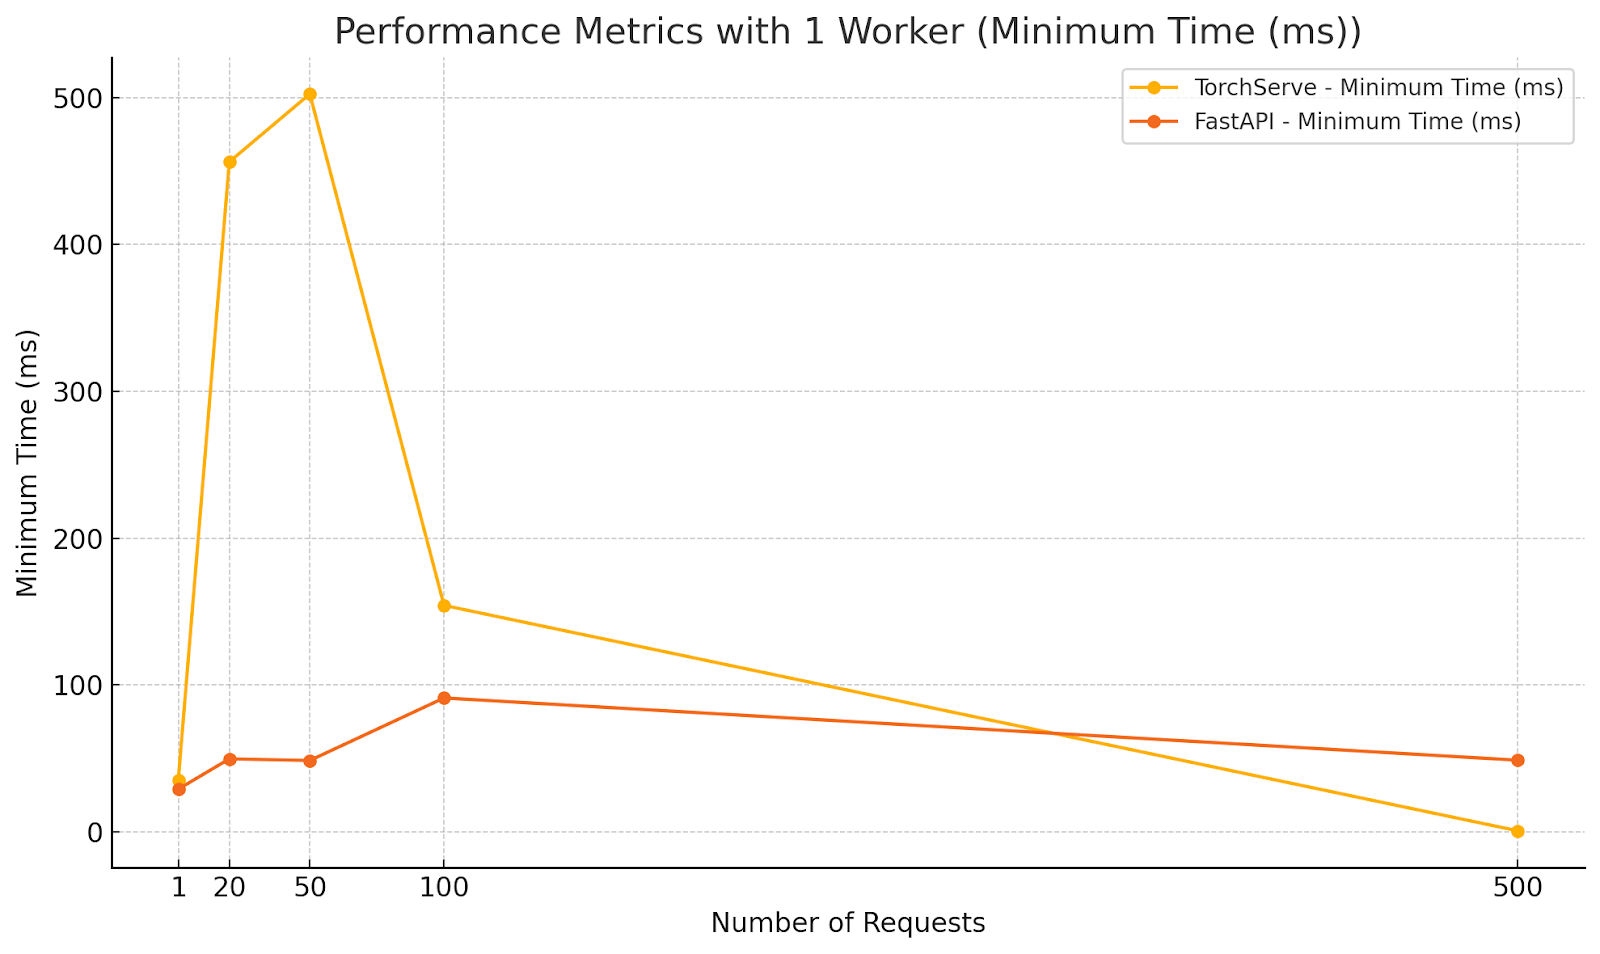


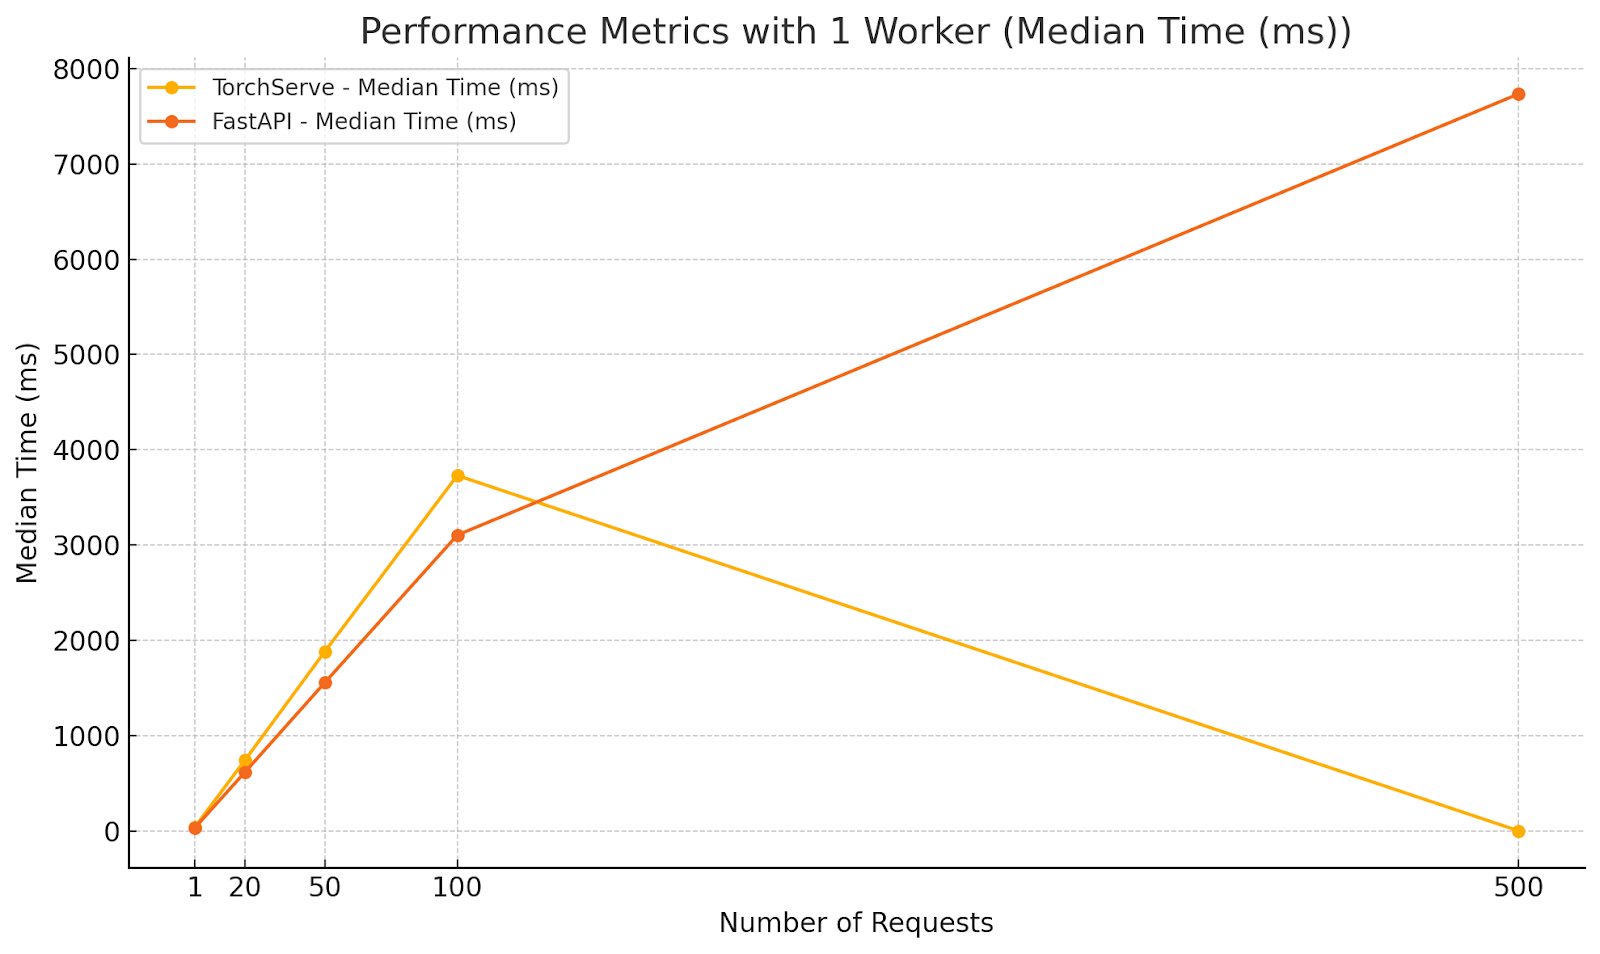

Analysis:
- FastAPI outperformed TorchServe in average and median response times under moderate concurrency with a single worker.
- The lower minimum time for FastAPI indicates quicker response for some requests, but the maximum times are closer, suggesting that both frameworks experience delays under increased load.
- TorchServe’s higher response times highlight the need for multiple workers to handle concurrency effectively.
Scenario 3: Multiple Workers, Increasing Concurrency
Configuration:
- Workers: 5
- Parallel Requests: 1, 20, 50, 100, 500
- Total Requests: 500
Diagrams illustrating the performance metrics for Scenario 3:
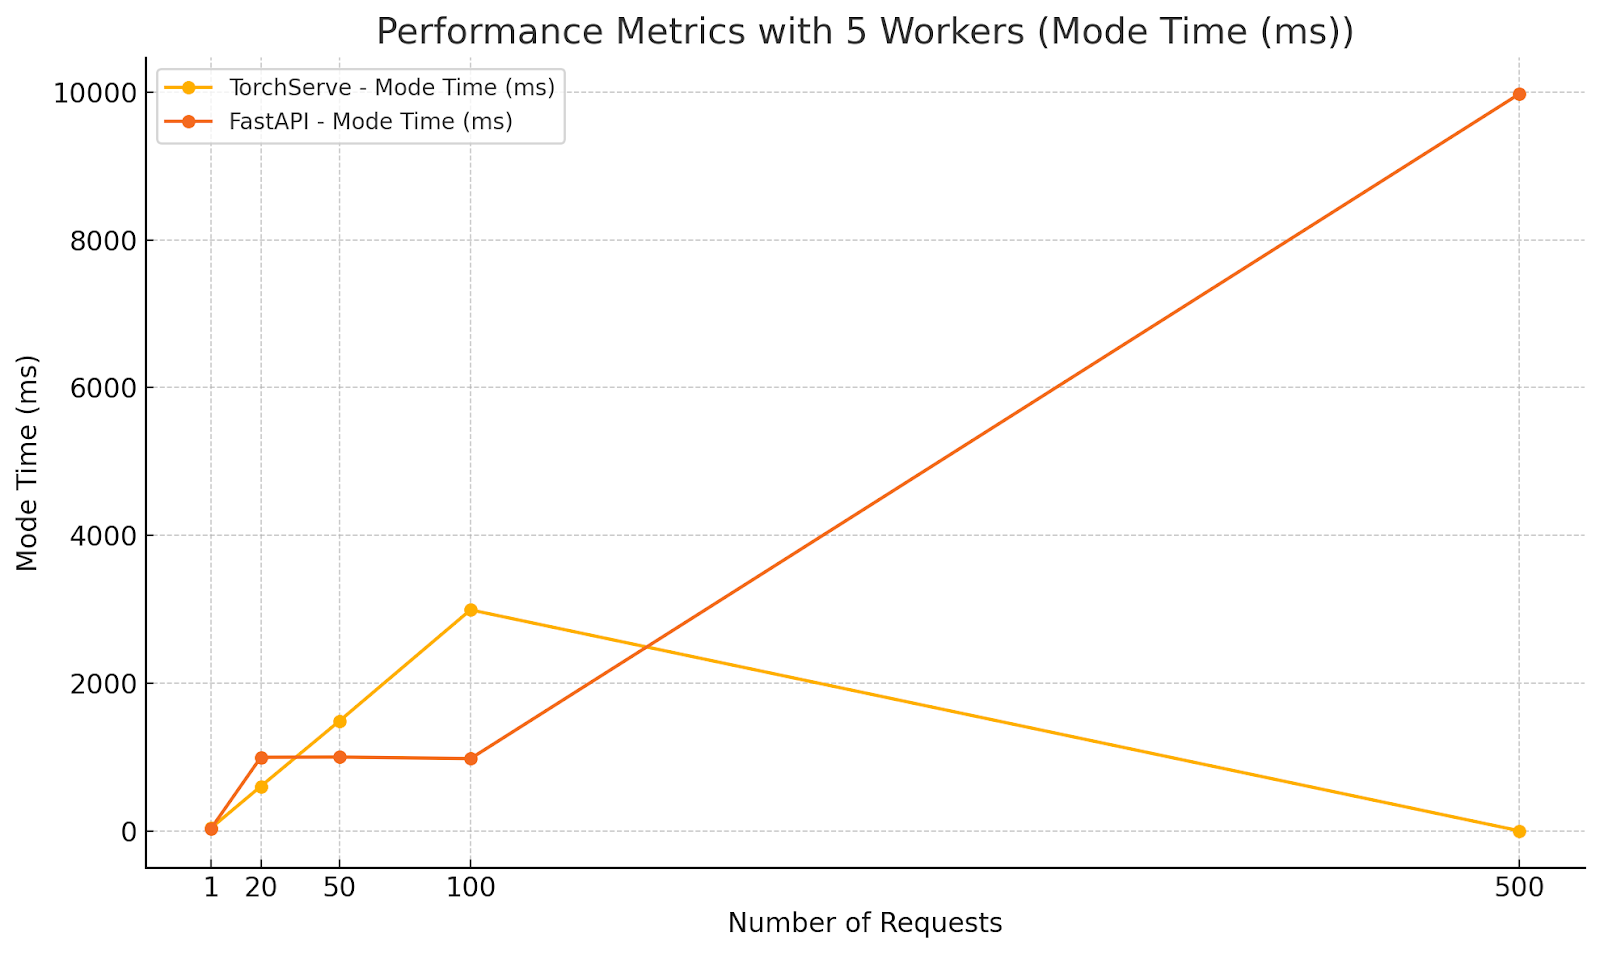
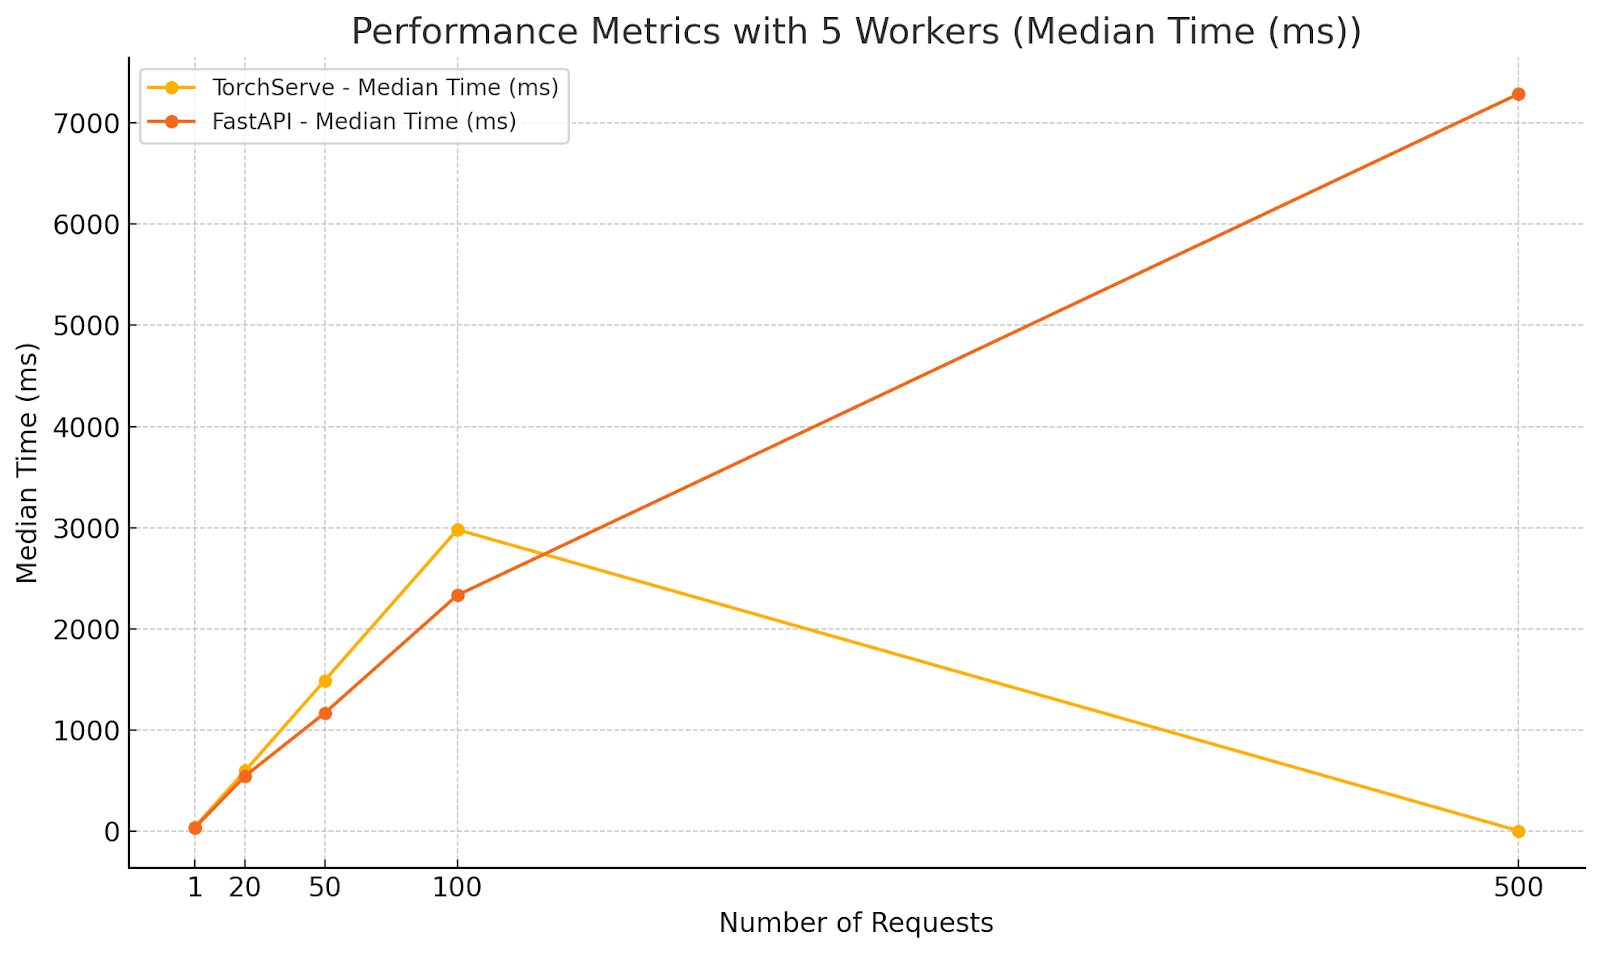
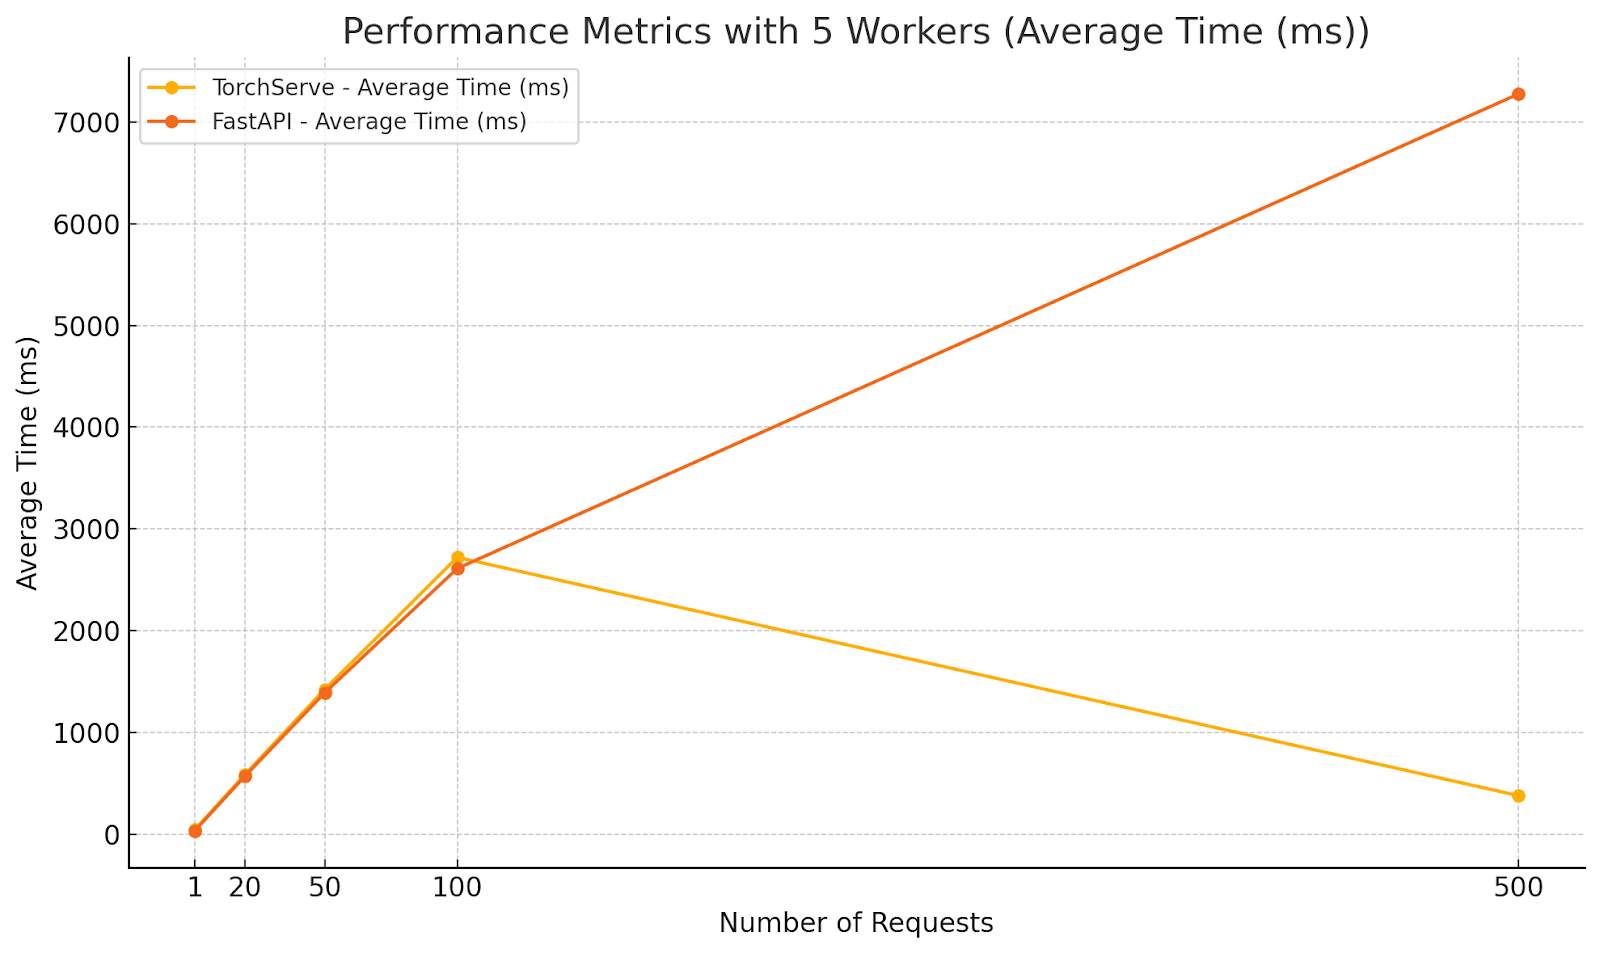

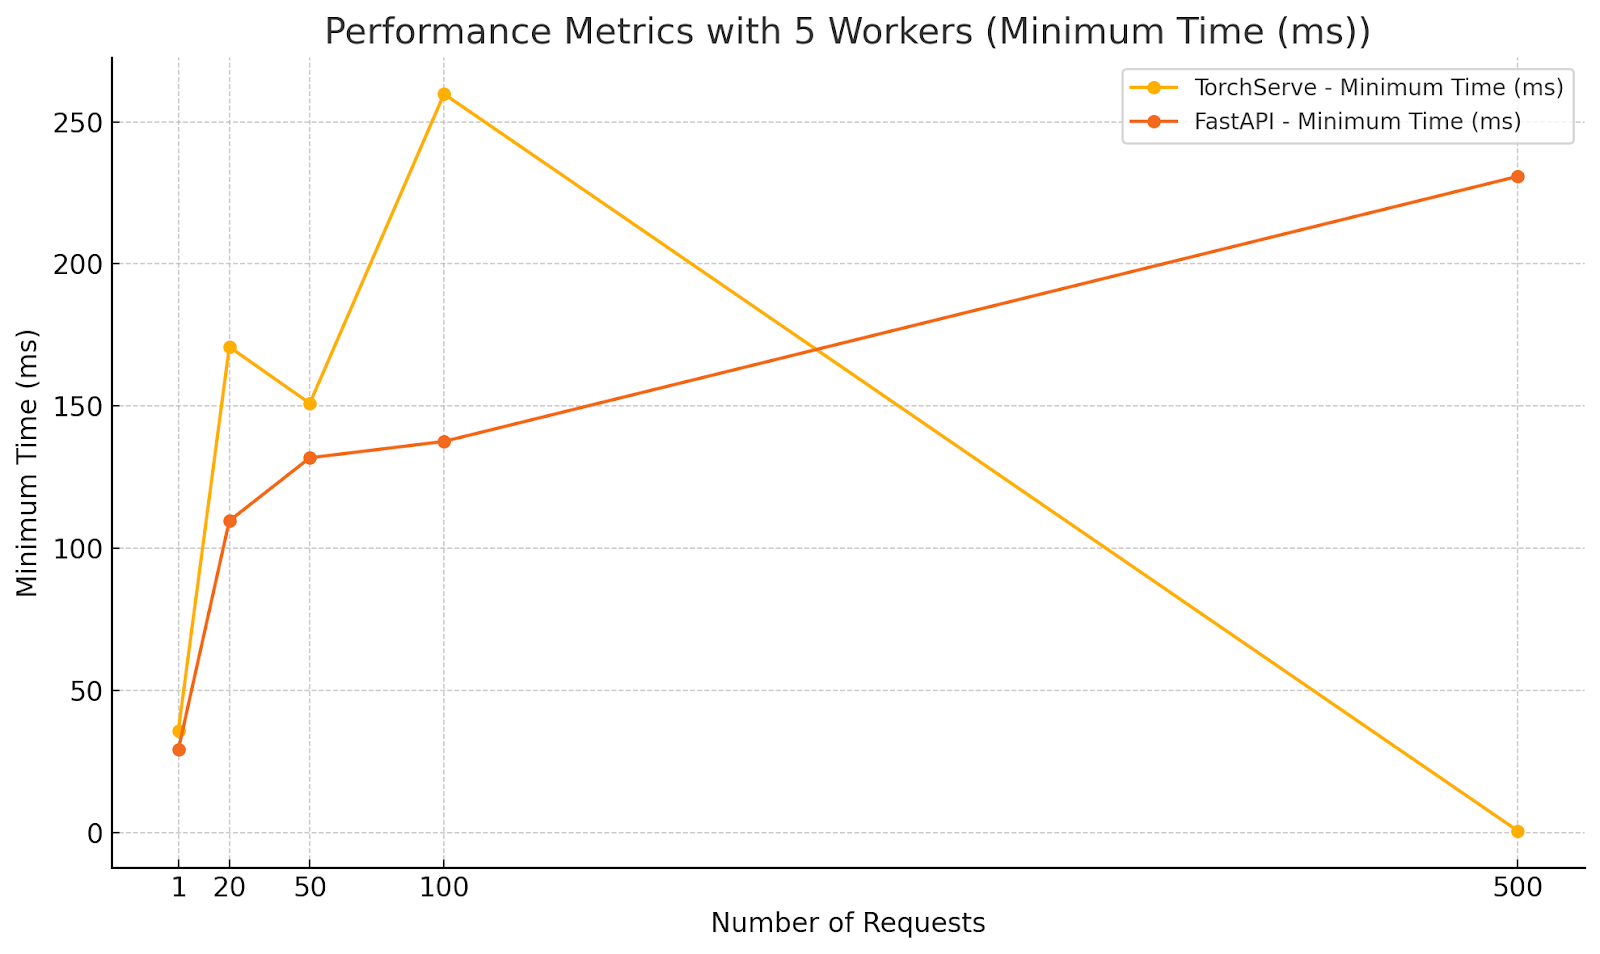
Analysis:
-
- TorchServe:
-
- Demonstrated increased average response times with higher concurrency, as expected.
-
- Maintained relatively stable maximum times compared to FastAPI, indicating better handling of high concurrency when multiple workers are used.
-
- Surprisingly, at 500 parallel requests, TorchServe’s average response time decreased significantly. This could be due to efficient batching or internal optimizations kicking in under extreme load.
- FastAPI:
-
- Showed lower minimum times across all concurrency levels, highlighting its ability to quickly handle individual requests.
-
- Experienced significant increases in maximum and average response times at higher concurrency levels, indicating potential performance bottlenecks.
-
- At 500 parallel requests, FastAPI’s average response time exceeded 7 seconds, which is unacceptable for real-time applications.
Key Observations
- Consistency: TorchServe provided more consistent response times, especially under high load, due to its optimized request handling and worker management.
- Scalability: TorchServe scaled better with increased concurrency when configured with multiple workers. FastAPI’s performance degraded significantly at higher concurrency levels.
- Resource Utilization: TorchServe’s ability to handle more requests with fewer resources can lead to cost savings in production environments.
- FastAPI’s Strengths: At low concurrency, FastAPI was competitive and sometimes faster in terms of minimum response time, making it suitable for applications with low to moderate traffic.
Recommendations
- High-Concurrency Applications: Use TorchServe when expecting high levels of concurrent requests. Its architecture is better suited to scale horizontally with multiple workers.
- Low to Moderate Traffic: Consider FastAPI for applications with predictable, low to moderate traffic, where its simplicity and flexibility can be advantageous.
- Worker Configuration: Properly configure the number of workers in TorchServe based on expected load to optimize performance.
- Monitoring and Tuning: Continuously monitor performance metrics in production and adjust configurations as necessary for both TorchServe and FastAPI.
Our evaluation indicates that TorchServe is generally more robust and scalable for serving PyTorch models in production environments, especially under high concurrency. TorchServe’s architecture is optimized to handle multiple concurrent requests efficiently, providing consistent and reliable performance.
On the other hand, FastAPI offers simplicity and speed for applications with lower concurrency demands. FastAPI is a good choice when ease of development and integration with other Python web applications is a priority.
Ultimately, the choice between TorchServe and FastAPI should depend on your application’s specific requirements, such as traffic patterns, resource availability, and performance goals.
- Number of Workers: The number of worker processes handling inference requests. For TorchServe, this is configurable per model.
- Parallel Requests: The number of concurrent requests sent to the server, simulating different levels of user demand.
- Total Requests: The total number of requests sent during each test to ensure statistical significance.
We recorded the following metrics for analysis:
- Minimum Time: The shortest time taken to process a request.
- Maximum Time: The longest time taken to process a request.
- Average (Mean): The average time taken across all requests.
- Median: The middle value in the list of recorded times, providing a measure of central tendency less affected by outliers.
- Mode: The most frequently occurring response time in the dataset.
Results and Analysis
Scenario 1: Single Worker, Single Request
Configuration:
- Workers: 1
- Parallel Requests: 1
- Total Requests: 500
Performance Metrics:
| Approach |
Min Time |
Max Time |
Average |
Median |
Mode |
| TorchServe |
35.342ms |
55.192ms |
38.569ms |
38.082ms |
36.510ms |
| FastAPI |
29.045ms |
1276.5ms |
34.822ms |
31.326ms |
33.128ms |
Analysis:
- FastAPI had a slightly lower minimum and average response time, indicating faster individual request handling in this minimal load scenario.
- TorchServe showed more consistent performance with a smaller gap between minimum and maximum times, suggesting better reliability.
- FastAPI exhibited significant variability with a high maximum time, possibly due to occasional latency spikes.
Scenario 2: Single Worker, Moderate Concurrency
Configuration:
- Workers: 1
- Parallel Requests: 20
- Total Requests: 500
Diagrams illustrating the performance metrics for Scenario 2:


Analysis:
- FastAPI outperformed TorchServe in average and median response times under moderate concurrency with a single worker.
- The lower minimum time for FastAPI indicates quicker response for some requests, but the maximum times are closer, suggesting that both frameworks experience delays under increased load.
- TorchServe’s higher response times highlight the need for multiple workers to handle concurrency effectively.
Scenario 3: Multiple Workers, Increasing Concurrency
Configuration:
- Workers: 5
- Parallel Requests: 1, 20, 50, 100, 500
- Total Requests: 500
Diagrams illustrating the performance metrics for Scenario 3:


Analysis:
-
- TorchServe:
-
- Demonstrated increased average response times with higher concurrency, as expected.
-
- Maintained relatively stable maximum times compared to FastAPI, indicating better handling of high concurrency when multiple workers are used.
-
- Surprisingly, at 500 parallel requests, TorchServe’s average response time decreased significantly. This could be due to efficient batching or internal optimizations kicking in under extreme load.
- FastAPI:
-
- Showed lower minimum times across all concurrency levels, highlighting its ability to quickly handle individual requests.
-
- Experienced significant increases in maximum and average response times at higher concurrency levels, indicating potential performance bottlenecks.
-
- At 500 parallel requests, FastAPI’s average response time exceeded 7 seconds, which is unacceptable for real-time applications.
Key Observations
- Consistency: TorchServe provided more consistent response times, especially under high load, due to its optimized request handling and worker management.
- Scalability: TorchServe scaled better with increased concurrency when configured with multiple workers. FastAPI’s performance degraded significantly at higher concurrency levels.
- Resource Utilization: TorchServe’s ability to handle more requests with fewer resources can lead to cost savings in production environments.
- FastAPI’s Strengths: At low concurrency, FastAPI was competitive and sometimes faster in terms of minimum response time, making it suitable for applications with low to moderate traffic.
Recommendations
- High-Concurrency Applications: Use TorchServe when expecting high levels of concurrent requests. Its architecture is better suited to scale horizontally with multiple workers.
- Low to Moderate Traffic: Consider FastAPI for applications with predictable, low to moderate traffic, where its simplicity and flexibility can be advantageous.
- Worker Configuration: Properly configure the number of workers in TorchServe based on expected load to optimize performance.
- Monitoring and Tuning: Continuously monitor performance metrics in production and adjust configurations as necessary for both TorchServe and FastAPI.
Our evaluation indicates that TorchServe is generally more robust and scalable for serving PyTorch models in production environments, especially under high concurrency. TorchServe’s architecture is optimized to handle multiple concurrent requests efficiently, providing consistent and reliable performance.
On the other hand, FastAPI offers simplicity and speed for applications with lower concurrency demands. FastAPI is a good choice when ease of development and integration with other Python web applications is a priority.
Ultimately, the choice between TorchServe and FastAPI should depend on your application’s specific requirements, such as traffic patterns, resource availability, and performance goals.
-
- Model Training: Develop and train your models in PyTorch for tasks such as image classification, object detection, or natural language processing.
- Model Packaging: Use the Torch Model Archiver to package the trained model, its associated weights, and optional custom handlers into a single .mar file.
- Model Serving: Deploy the packaged model using TorchServe, which efficiently handles inference requests with built-in handlers or custom logic for specialized use cases.
- Model Versioning and A/B Testing: TorchServe supports simultaneously serving multiple model versions, facilitating A/B testing and smooth transitions between model updates in production.
- Client Interaction: Client applications interact with TorchServe by sending REST API requests and receiving real-time predictions, seamlessly integrating model inference into their workflows.
For detailed information, go to the TorchServe documentation.
TorchServe Architecture
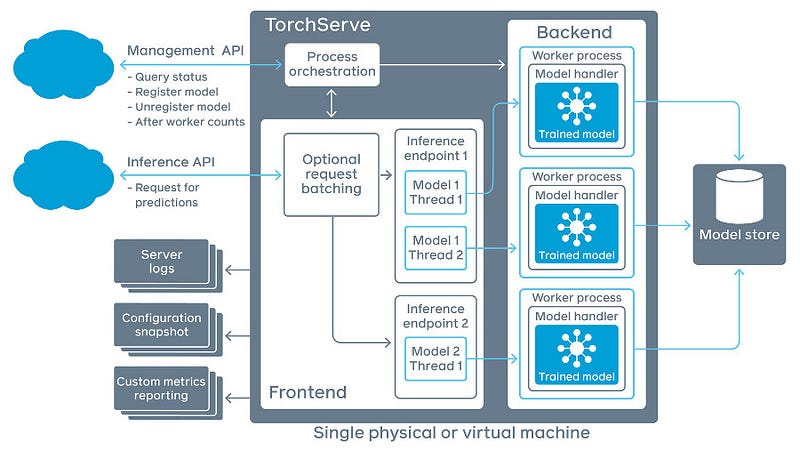
The architecture of TorchServe is designed to manage model serving at scale efficiently:
- Frontend: Handles incoming client requests and responses, and manages the lifecycle of models, including loading and unloading.
- Model Workers: Dedicated processes responsible for running model inference. Each worker handles requests for a specific model and can utilize CPU or GPU resources as configured.
- Model Store: A repository where all loadable models (.mar files) are stored. TorchServe loads models from this location upon request.
- Plugins: Extend TorchServe’s functionality with custom components such as authentication mechanisms, custom endpoints, or specialized batching algorithms.
By abstracting these components, TorchServe provides a robust and flexible platform tailored to various deployment needs while maintaining high performance and scalability.
Setting Up Your Environment for TorchServe and Detectron2
To set up the environment for serving models with TorchServe and working with the custom model handler for Detectron2, follow these detailed steps:
Step-by-Step Guide
- Install Python and Required Tools:
-
- Ensure Python 3.8 or higher is installed.
- Clone the TorchServe Repository:
git clone https://github.com/pytorch/serve.git
- Navigate to the Example Directory:
cd serve/examples/object_detector/detectron2
- Install Dependencies:
-
- Install all required Python packages by running:
pip install -r requirements.txt
-
- Install Detectron2 and a compatible version of NumPy:
pip install git+https://github.com/facebookresearch/detectron2.git && pip install numpy==1.21.6
- Verify Installation:
-
- Run the following command to check if TorchServe is installed and accessible:
torchserve --help
-
- Verify the installation of Detectron2 by importing it in a Python shell:
import detectron2
print("Detectron2 is installed correctly!")
Refer to the complete README file.
Deep Dive into the Model Handler Code
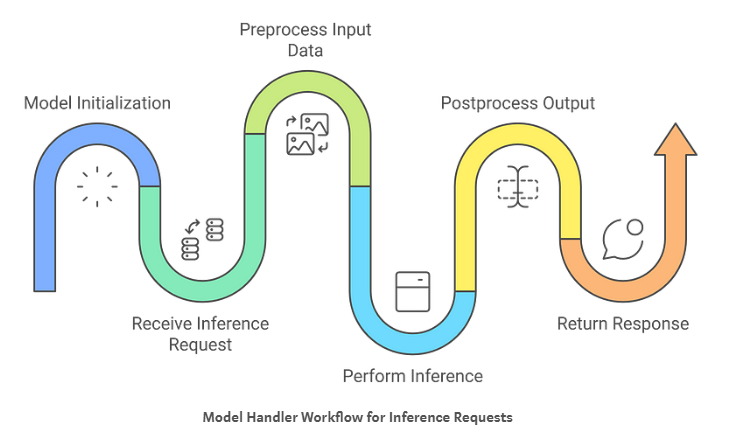
Here is a brief overview of each step:
- Model Initialization: The
ModelHandler loads the Detectron2 model once during startup, checking for GPU availability to set the device (CPU or GPU) accordingly. It initializes the model with the specified weights and configuration, preparing the DefaultPredictor for efficient inference without reloading for each request.
- Preprocessing Input Data: For each incoming request, the handler validates the image data, reads it into a
BytesIO stream, and uses PIL to convert it to RGB format. It then transforms the image into a NumPy array and converts it to BGR format, ensuring it’s correctly formatted for the model.
- Performing Inference: The handler uses the pre-initialized predictor to perform inference on the preprocessed images. It processes each image to obtain predictions like classes, bounding boxes, and scores, utilizing the model efficiently without additional overhead.
- Postprocessing Output Data: It extracts relevant prediction data from the inference outputs, such as classes and bounding boxes, and formats them into a dictionary. The handler then serializes this dictionary into a JSON string, providing a client-friendly response.
- Handling Requests: The
handle method orchestrates the entire process by ensuring the model is initialized and then sequentially executing the preprocessing, inference, and postprocessing steps. It handles errors gracefully and returns the final predictions to the client.
You can find the code for the ModelHandler here: Feature/Add TorchServe Detectron2 on GitHub
Managing & Scaling TorchServe Models
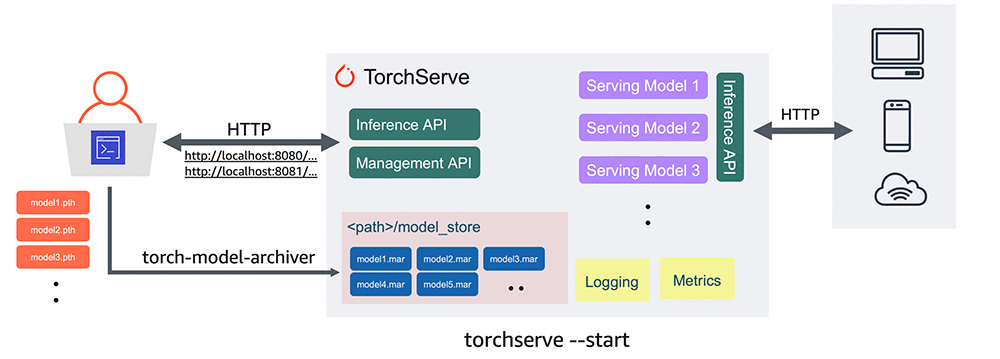
It is best to use Conda or other virtual environments tailored to your project’s requirements to effectively manage dependencies. Then, install TorchServe following the instructions provided on GitHub. If you’ve already completed the installation as outlined in the README file, you can skip this step.
Steps to Deploy Your Model with TorchServe
- Download the TorchServe Repository:
-
- Access the TorchServe examples by running the following commands:
mkdir torchserve-examples
cd torchserve-examples
git clone https://github.com/pytorch/serve.git
- Download a Pre-Trained Model:
-
- Download a Fast R-CNN object detection model by running:
wget https://download.pytorch.org/models/fasterrcnn_resnet50_fpn_coco-258fb6c6.pth
- Convert the Model to TorchServe Format:
-
- Use the
torch-model-archiver tool to package the model into a .mar file by running the following command:
torch-model-archiver --model-name model --version 1.0 --serialized-file model.pth --extra-files config.yaml --handler serve/examples/object_detector/detectron2/detectron2-handler.py -f
ls *.mar
- Host the Model:
-
- Move the
.mar file to a model store directory and start TorchServe:
mkdir model_store
mv model.mar model_store/
torchserve --start --model-store model_store --models model=model.mar --disable-token-auth
- Test the Model with TorchServe:
-
- Test the hosted model by opening another terminal on the same host and using the following commands (you can use tmux to manage multiple sessions):
curl -O https://s3.amazonaws.com/model-server/inputs/kitten.jpg
curl -X POST http://127.0.0.1:8080/predictions/model -T kitten.jpg
[
    {
        "class": "tiger_cat",
        "box": [34.5, 23.1, 100.4, 200.2],
        "score": 0.4693356156349182
    },
    {
        "class": "tabby",
        "box": [12.0, 50.1, 90.2, 180.3],
        "score": 0.46338796615600586
    }
]
- List Registered Models:
-
- Query the list of models hosted by TorchServe:
curl "http://localhost:8081/models"
{
    "models": [
        {
            "modelName": "model",
            "modelUrl": "model.mar"
        }
    ]
}
- Scale Model Workers:
-
- A new model has no workers assigned to it, so set a minimum number of workers with the following code:
curl -v -X PUT "http://localhost:8081/models/model?min_worker=2"
curl "http://localhost:8081/models/model"
- Unregister a Model:
-
- Remove the model from TorchServe:
curl -X DELETE http://localhost:8081/models/model/
- Version a Model:
-
- To version a model, when calling
torch-model-archiver, pass a version number to the --version:
torch-model-archiver --model-name model --version 1.0 ...
Comparing TorchServe vs FastAPI Model Serving Options
When deploying PyTorch models to production, choosing the right serving framework plays an important role in optimal performance, scalability, and efficient resource management. At UpStart Commerce, we compared two common approaches: TorchServe and FastAPI. This evaluation provides insights based on data collected under various configurations and workloads.
Methodology
We conducted a series of performance tests to measure and compare the latency and throughput of TorchServe and FastAPI when serving the same PyTorch model. The tests varied in terms of:
- Number of Workers: The number of worker processes handling inference requests. For TorchServe, this is configurable per model.
- Parallel Requests: The number of concurrent requests sent to the server, simulating different levels of user demand.
- Total Requests: The total number of requests sent during each test to ensure statistical significance.
We recorded the following metrics for analysis:
- Minimum Time: The shortest time taken to process a request.
- Maximum Time: The longest time taken to process a request.
- Average (Mean): The average time taken across all requests.
- Median: The middle value in the list of recorded times, providing a measure of central tendency less affected by outliers.
- Mode: The most frequently occurring response time in the dataset.
Results and Analysis
Scenario 1: Single Worker, Single Request
Configuration:
- Workers: 1
- Parallel Requests: 1
- Total Requests: 500
Performance Metrics:
| Approach |
Min Time |
Max Time |
Average |
Median |
Mode |
| TorchServe |
35.342ms |
55.192ms |
38.569ms |
38.082ms |
36.510ms |
| FastAPI |
29.045ms |
1276.5ms |
34.822ms |
31.326ms |
33.128ms |
Analysis:
- FastAPI had a slightly lower minimum and average response time, indicating faster individual request handling in this minimal load scenario.
- TorchServe showed more consistent performance with a smaller gap between minimum and maximum times, suggesting better reliability.
- FastAPI exhibited significant variability with a high maximum time, possibly due to occasional latency spikes.
Scenario 2: Single Worker, Moderate Concurrency
Configuration:
- Workers: 1
- Parallel Requests: 20
- Total Requests: 500
Diagrams illustrating the performance metrics for Scenario 2:


Analysis:
- FastAPI outperformed TorchServe in average and median response times under moderate concurrency with a single worker.
- The lower minimum time for FastAPI indicates quicker response for some requests, but the maximum times are closer, suggesting that both frameworks experience delays under increased load.
- TorchServe’s higher response times highlight the need for multiple workers to handle concurrency effectively.
Scenario 3: Multiple Workers, Increasing Concurrency
Configuration:
- Workers: 5
- Parallel Requests: 1, 20, 50, 100, 500
- Total Requests: 500
Diagrams illustrating the performance metrics for Scenario 3:


Analysis:
-
- TorchServe:
-
- Demonstrated increased average response times with higher concurrency, as expected.
-
- Maintained relatively stable maximum times compared to FastAPI, indicating better handling of high concurrency when multiple workers are used.
-
- Surprisingly, at 500 parallel requests, TorchServe’s average response time decreased significantly. This could be due to efficient batching or internal optimizations kicking in under extreme load.
- FastAPI:
-
- Showed lower minimum times across all concurrency levels, highlighting its ability to quickly handle individual requests.
-
- Experienced significant increases in maximum and average response times at higher concurrency levels, indicating potential performance bottlenecks.
-
- At 500 parallel requests, FastAPI’s average response time exceeded 7 seconds, which is unacceptable for real-time applications.
Key Observations
- Consistency: TorchServe provided more consistent response times, especially under high load, due to its optimized request handling and worker management.
- Scalability: TorchServe scaled better with increased concurrency when configured with multiple workers. FastAPI’s performance degraded significantly at higher concurrency levels.
- Resource Utilization: TorchServe’s ability to handle more requests with fewer resources can lead to cost savings in production environments.
- FastAPI’s Strengths: At low concurrency, FastAPI was competitive and sometimes faster in terms of minimum response time, making it suitable for applications with low to moderate traffic.
Recommendations
- High-Concurrency Applications: Use TorchServe when expecting high levels of concurrent requests. Its architecture is better suited to scale horizontally with multiple workers.
- Low to Moderate Traffic: Consider FastAPI for applications with predictable, low to moderate traffic, where its simplicity and flexibility can be advantageous.
- Worker Configuration: Properly configure the number of workers in TorchServe based on expected load to optimize performance.
- Monitoring and Tuning: Continuously monitor performance metrics in production and adjust configurations as necessary for both TorchServe and FastAPI.
Our evaluation indicates that TorchServe is generally more robust and scalable for serving PyTorch models in production environments, especially under high concurrency. TorchServe’s architecture is optimized to handle multiple concurrent requests efficiently, providing consistent and reliable performance.
On the other hand, FastAPI offers simplicity and speed for applications with lower concurrency demands. FastAPI is a good choice when ease of development and integration with other Python web applications is a priority.
Ultimately, the choice between TorchServe and FastAPI should depend on your application’s specific requirements, such as traffic patterns, resource availability, and performance goals.
-
- Model Training: Develop and train your models in PyTorch for tasks such as image classification, object detection, or natural language processing.
- Model Packaging: Use the Torch Model Archiver to package the trained model, its associated weights, and optional custom handlers into a single .mar file.
- Model Serving: Deploy the packaged model using TorchServe, which efficiently handles inference requests with built-in handlers or custom logic for specialized use cases.
- Model Versioning and A/B Testing: TorchServe supports simultaneously serving multiple model versions, facilitating A/B testing and smooth transitions between model updates in production.
- Client Interaction: Client applications interact with TorchServe by sending REST API requests and receiving real-time predictions, seamlessly integrating model inference into their workflows.
For detailed information, go to the TorchServe documentation.
TorchServe Architecture

The architecture of TorchServe is designed to manage model serving at scale efficiently:
- Frontend: Handles incoming client requests and responses, and manages the lifecycle of models, including loading and unloading.
- Model Workers: Dedicated processes responsible for running model inference. Each worker handles requests for a specific model and can utilize CPU or GPU resources as configured.
- Model Store: A repository where all loadable models (.mar files) are stored. TorchServe loads models from this location upon request.
- Plugins: Extend TorchServe’s functionality with custom components such as authentication mechanisms, custom endpoints, or specialized batching algorithms.
By abstracting these components, TorchServe provides a robust and flexible platform tailored to various deployment needs while maintaining high performance and scalability.
Setting Up Your Environment for TorchServe and Detectron2
To set up the environment for serving models with TorchServe and working with the custom model handler for Detectron2, follow these detailed steps:
Step-by-Step Guide
- Install Python and Required Tools:
-
- Ensure Python 3.8 or higher is installed.
- Clone the TorchServe Repository:
git clone https://github.com/pytorch/serve.git
- Navigate to the Example Directory:
cd serve/examples/object_detector/detectron2
- Install Dependencies:
-
- Install all required Python packages by running:
pip install -r requirements.txt
-
- Install Detectron2 and a compatible version of NumPy:
pip install git+https://github.com/facebookresearch/detectron2.git && pip install numpy==1.21.6
- Verify Installation:
-
- Run the following command to check if TorchServe is installed and accessible:
torchserve --help
-
- Verify the installation of Detectron2 by importing it in a Python shell:
import detectron2
print("Detectron2 is installed correctly!")
Refer to the complete README file.
Deep Dive into the Model Handler Code

Here is a brief overview of each step:
- Model Initialization: The
ModelHandler loads the Detectron2 model once during startup, checking for GPU availability to set the device (CPU or GPU) accordingly. It initializes the model with the specified weights and configuration, preparing the DefaultPredictor for efficient inference without reloading for each request.
- Preprocessing Input Data: For each incoming request, the handler validates the image data, reads it into a
BytesIO stream, and uses PIL to convert it to RGB format. It then transforms the image into a NumPy array and converts it to BGR format, ensuring it’s correctly formatted for the model.
- Performing Inference: The handler uses the pre-initialized predictor to perform inference on the preprocessed images. It processes each image to obtain predictions like classes, bounding boxes, and scores, utilizing the model efficiently without additional overhead.
- Postprocessing Output Data: It extracts relevant prediction data from the inference outputs, such as classes and bounding boxes, and formats them into a dictionary. The handler then serializes this dictionary into a JSON string, providing a client-friendly response.
- Handling Requests: The
handle method orchestrates the entire process by ensuring the model is initialized and then sequentially executing the preprocessing, inference, and postprocessing steps. It handles errors gracefully and returns the final predictions to the client.
You can find the code for the ModelHandler here: Feature/Add TorchServe Detectron2 on GitHub
Managing & Scaling TorchServe Models

It is best to use Conda or other virtual environments tailored to your project’s requirements to effectively manage dependencies. Then, install TorchServe following the instructions provided on GitHub. If you’ve already completed the installation as outlined in the README file, you can skip this step.
Steps to Deploy Your Model with TorchServe
- Download the TorchServe Repository:
-
- Access the TorchServe examples by running the following commands:
mkdir torchserve-examples
cd torchserve-examples
git clone https://github.com/pytorch/serve.git
- Download a Pre-Trained Model:
-
- Download a Fast R-CNN object detection model by running:
wget https://download.pytorch.org/models/fasterrcnn_resnet50_fpn_coco-258fb6c6.pth
- Convert the Model to TorchServe Format:
-
- Use the
torch-model-archiver tool to package the model into a .mar file by running the following command:
torch-model-archiver --model-name model --version 1.0 --serialized-file model.pth --extra-files config.yaml --handler serve/examples/object_detector/detectron2/detectron2-handler.py -f
ls *.mar
- Host the Model:
-
- Move the
.mar file to a model store directory and start TorchServe:
mkdir model_store
mv model.mar model_store/
torchserve --start --model-store model_store --models model=model.mar --disable-token-auth
- Test the Model with TorchServe:
-
- Test the hosted model by opening another terminal on the same host and using the following commands (you can use tmux to manage multiple sessions):
curl -O https://s3.amazonaws.com/model-server/inputs/kitten.jpg
curl -X POST http://127.0.0.1:8080/predictions/model -T kitten.jpg
[
    {
        "class": "tiger_cat",
        "box": [34.5, 23.1, 100.4, 200.2],
        "score": 0.4693356156349182
    },
    {
        "class": "tabby",
        "box": [12.0, 50.1, 90.2, 180.3],
        "score": 0.46338796615600586
    }
]
- List Registered Models:
-
- Query the list of models hosted by TorchServe:
curl "http://localhost:8081/models"
{
    "models": [
        {
            "modelName": "model",
            "modelUrl": "model.mar"
        }
    ]
}
- Scale Model Workers:
-
- A new model has no workers assigned to it, so set a minimum number of workers with the following code:
curl -v -X PUT "http://localhost:8081/models/model?min_worker=2"
curl "http://localhost:8081/models/model"
- Unregister a Model:
-
- Remove the model from TorchServe:
curl -X DELETE http://localhost:8081/models/model/
- Version a Model:
-
- To version a model, when calling
torch-model-archiver, pass a version number to the --version:
torch-model-archiver --model-name model --version 1.0 ...
Comparing TorchServe vs FastAPI Model Serving Options
When deploying PyTorch models to production, choosing the right serving framework plays an important role in optimal performance, scalability, and efficient resource management. At UpStart Commerce, we compared two common approaches: TorchServe and FastAPI. This evaluation provides insights based on data collected under various configurations and workloads.
Methodology
We conducted a series of performance tests to measure and compare the latency and throughput of TorchServe and FastAPI when serving the same PyTorch model. The tests varied in terms of:
- Number of Workers: The number of worker processes handling inference requests. For TorchServe, this is configurable per model.
- Parallel Requests: The number of concurrent requests sent to the server, simulating different levels of user demand.
- Total Requests: The total number of requests sent during each test to ensure statistical significance.
We recorded the following metrics for analysis:
- Minimum Time: The shortest time taken to process a request.
- Maximum Time: The longest time taken to process a request.
- Average (Mean): The average time taken across all requests.
- Median: The middle value in the list of recorded times, providing a measure of central tendency less affected by outliers.
- Mode: The most frequently occurring response time in the dataset.
Results and Analysis
Scenario 1: Single Worker, Single Request
Configuration:
- Workers: 1
- Parallel Requests: 1
- Total Requests: 500
Performance Metrics:
| Approach |
Min Time |
Max Time |
Average |
Median |
Mode |
| TorchServe |
35.342ms |
55.192ms |
38.569ms |
38.082ms |
36.510ms |
| FastAPI |
29.045ms |
1276.5ms |
34.822ms |
31.326ms |
33.128ms |
Analysis:
- FastAPI had a slightly lower minimum and average response time, indicating faster individual request handling in this minimal load scenario.
- TorchServe showed more consistent performance with a smaller gap between minimum and maximum times, suggesting better reliability.
- FastAPI exhibited significant variability with a high maximum time, possibly due to occasional latency spikes.
Scenario 2: Single Worker, Moderate Concurrency
Configuration:
- Workers: 1
- Parallel Requests: 20
- Total Requests: 500
Diagrams illustrating the performance metrics for Scenario 2:


Analysis:
- FastAPI outperformed TorchServe in average and median response times under moderate concurrency with a single worker.
- The lower minimum time for FastAPI indicates quicker response for some requests, but the maximum times are closer, suggesting that both frameworks experience delays under increased load.
- TorchServe’s higher response times highlight the need for multiple workers to handle concurrency effectively.
Scenario 3: Multiple Workers, Increasing Concurrency
Configuration:
- Workers: 5
- Parallel Requests: 1, 20, 50, 100, 500
- Total Requests: 500
Diagrams illustrating the performance metrics for Scenario 3:


Analysis:
-
- TorchServe:
-
- Demonstrated increased average response times with higher concurrency, as expected.
-
- Maintained relatively stable maximum times compared to FastAPI, indicating better handling of high concurrency when multiple workers are used.
-
- Surprisingly, at 500 parallel requests, TorchServe’s average response time decreased significantly. This could be due to efficient batching or internal optimizations kicking in under extreme load.
- FastAPI:
-
- Showed lower minimum times across all concurrency levels, highlighting its ability to quickly handle individual requests.
-
- Experienced significant increases in maximum and average response times at higher concurrency levels, indicating potential performance bottlenecks.
-
- At 500 parallel requests, FastAPI’s average response time exceeded 7 seconds, which is unacceptable for real-time applications.
Key Observations
- Consistency: TorchServe provided more consistent response times, especially under high load, due to its optimized request handling and worker management.
- Scalability: TorchServe scaled better with increased concurrency when configured with multiple workers. FastAPI’s performance degraded significantly at higher concurrency levels.
- Resource Utilization: TorchServe’s ability to handle more requests with fewer resources can lead to cost savings in production environments.
- FastAPI’s Strengths: At low concurrency, FastAPI was competitive and sometimes faster in terms of minimum response time, making it suitable for applications with low to moderate traffic.
Recommendations
- High-Concurrency Applications: Use TorchServe when expecting high levels of concurrent requests. Its architecture is better suited to scale horizontally with multiple workers.
- Low to Moderate Traffic: Consider FastAPI for applications with predictable, low to moderate traffic, where its simplicity and flexibility can be advantageous.
- Worker Configuration: Properly configure the number of workers in TorchServe based on expected load to optimize performance.
- Monitoring and Tuning: Continuously monitor performance metrics in production and adjust configurations as necessary for both TorchServe and FastAPI.
Our evaluation indicates that TorchServe is generally more robust and scalable for serving PyTorch models in production environments, especially under high concurrency. TorchServe’s architecture is optimized to handle multiple concurrent requests efficiently, providing consistent and reliable performance.
On the other hand, FastAPI offers simplicity and speed for applications with lower concurrency demands. FastAPI is a good choice when ease of development and integration with other Python web applications is a priority.
Ultimately, the choice between TorchServe and FastAPI should depend on your application’s specific requirements, such as traffic patterns, resource availability, and performance goals.
